Appearance
Protecting VMs
1. Introduction
In this exercise you will create and run a Kasten policy for protecting Virtual Machines running on OpenShift and test restoring from both local and remote backup sources.
2. Creating a VM
Fist you will create a new VM in a new project to use for the exercise.
In the OpenShift Console, select the Project menu and click Create Project.
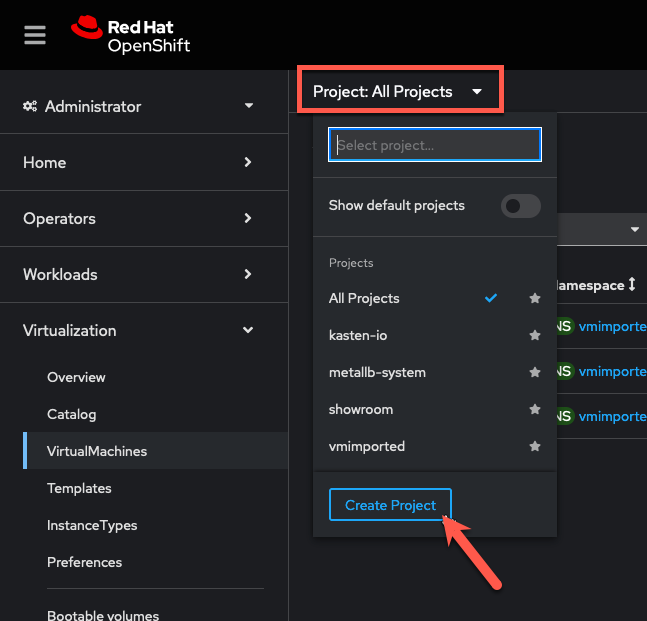
Specify
kasten-labas the Name and click Create.Select Virtualization → Virtual Machines from the sidebar, and click Create VirtualMachine → From template in the
kasten-labProject.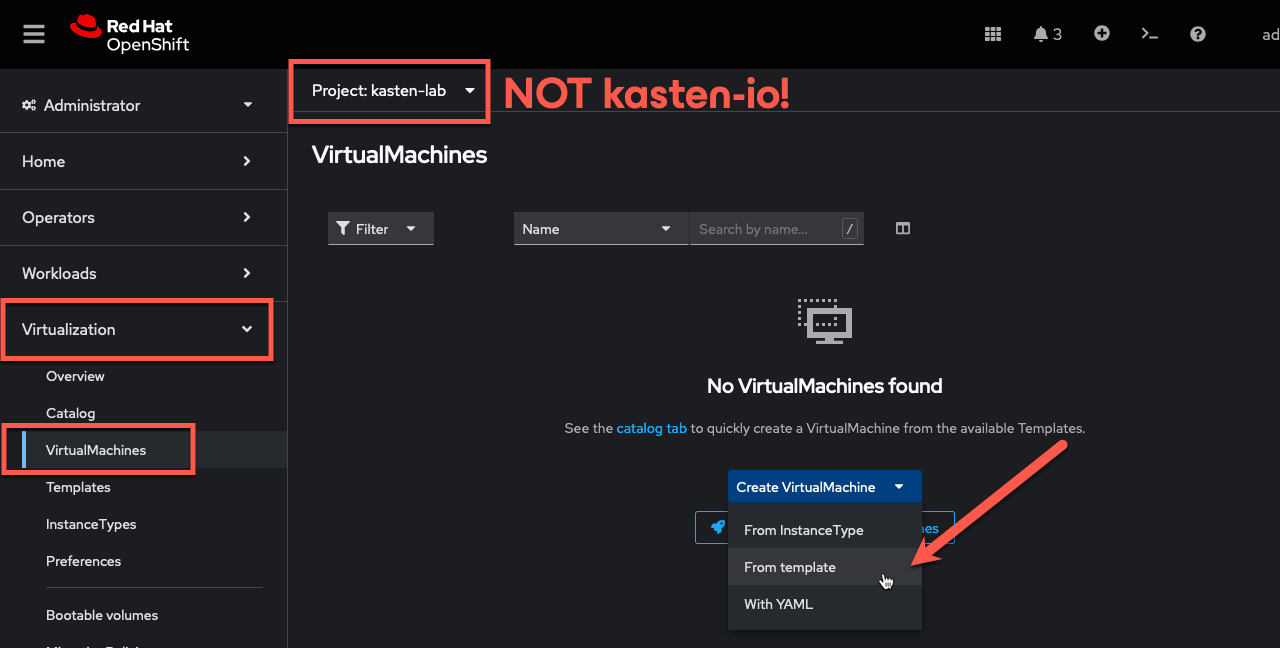
CAUTION
Kasten can be used to protect VMs provisioned using an
InstanceTypebut currently requires a manual transform be applied during the restore process, which is out of the scope of this lab exercise. Full support forInstanceTypeswill be added in an upcoming release.Under Template catalog, select the
fedora-server-smalltemplate.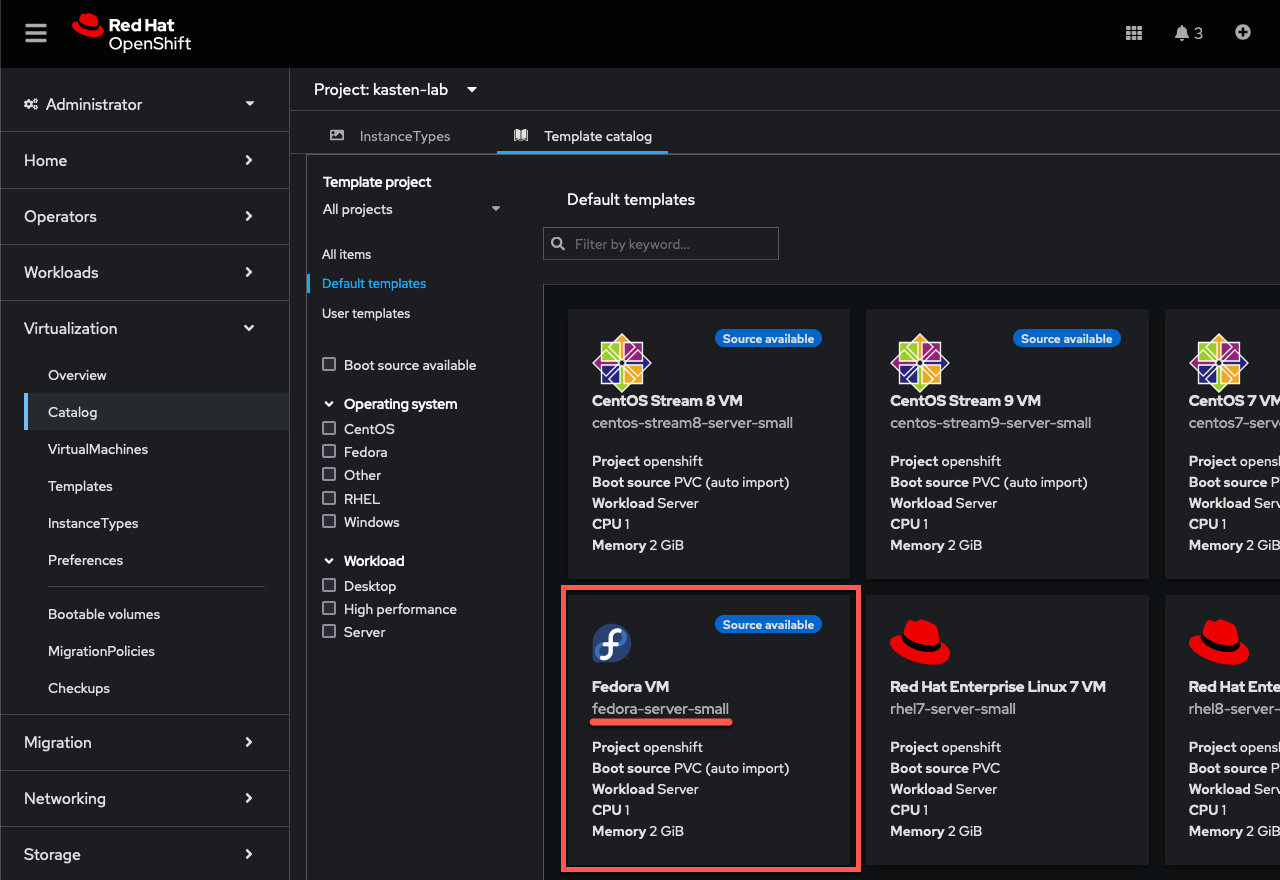
Update the VirtualMachine name to
fedora-k10and click Quick create VirtualMachine.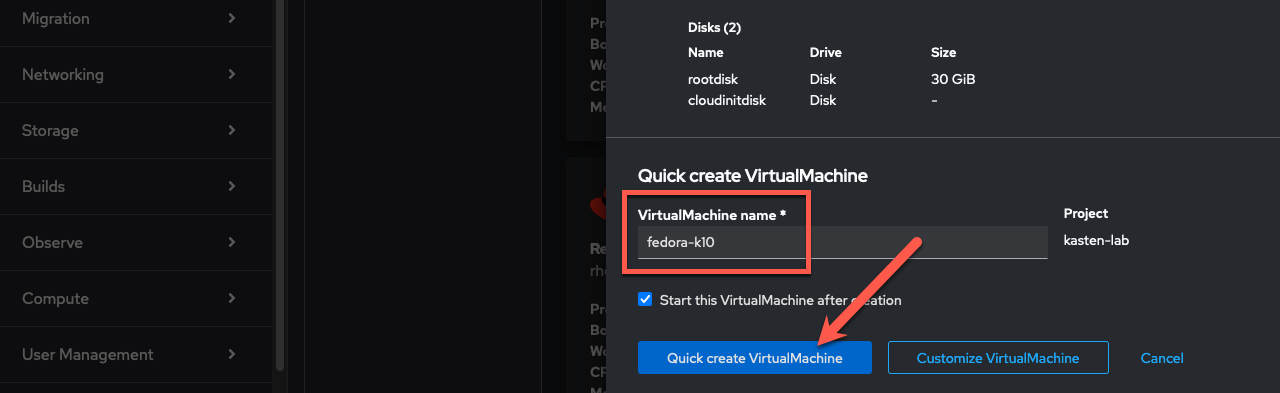
NOTE
This will provision the VM with preferred storage settings for the
ocs-external-storagecluster-ceph-rbdStorageClass, specifically Block VolumeMode to provide the ReadWriteMany access required to enable live migration between OpenShift nodes.Validate the
fedora-k10-volumePersistentVolumeClaim configuration from Storage → PersistentVolumeClaims in the sidebar.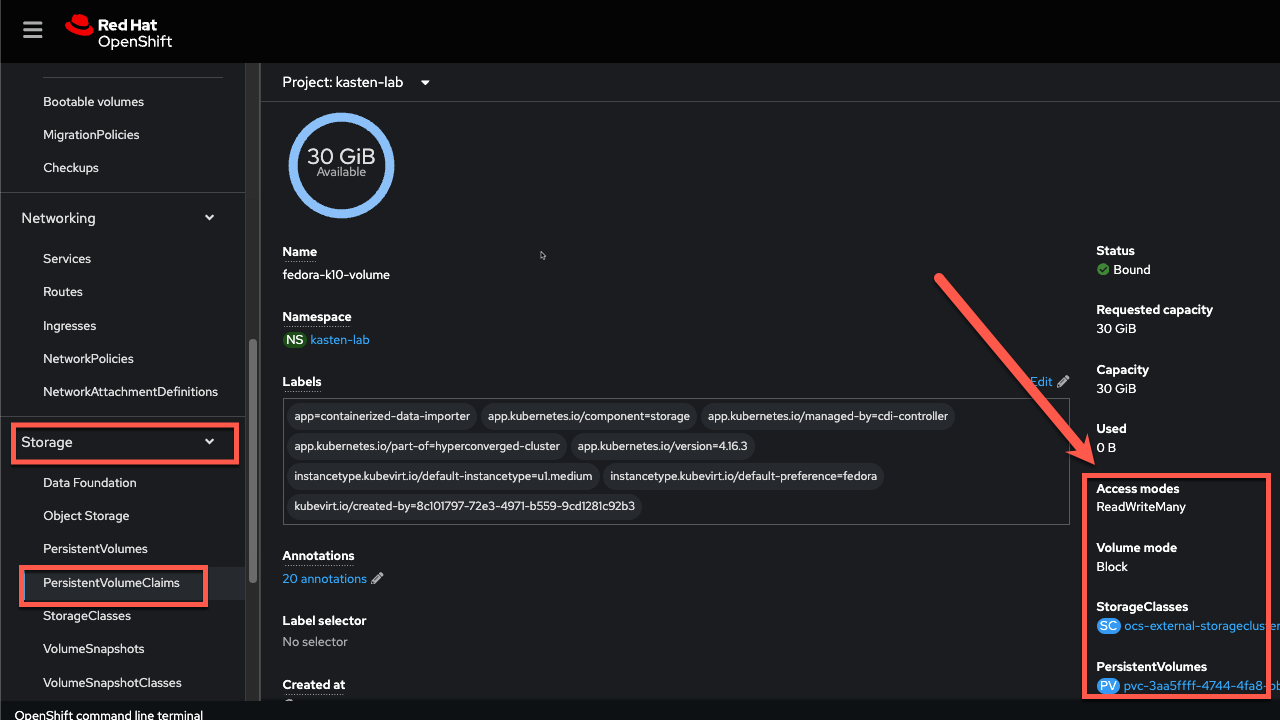
3. Enabling Block Mode Exports
NOTE
As some storage provisioners may not fully support Block volume mode, StorageClasses should first be evaluated for compatibility using the primer script. This is skipped in the lab exercise as the openshift-storage.rbd.csi.ceph.com provisioner is known to be compatible.
In the Web Terminal, run the following to allow the Kasten datamover to export raw Block volumes using the
ocs-external-storagecluster-ceph-rbdStorageClass:bashoc annotate storageclass ocs-external-storagecluster-ceph-rbd \ k10.kasten.io/sc-supports-block-mode-exports=trueBy default, Kasten provides an out-of-the-box, direct API integration with ODF's Ceph Volume Manager for block data movement - including support for incremental backups to lower storage consumption requirements for protecting Virtual Machines.
IMPORTANT
While many Kubernetes backup solutions can orchestrate local CSI snapshots of a
volumeMode: BlockPVC, it is important to remember that snapshots do not equal backup - and that having a backup solution that can provide off-cluster data movement forvolumeMode: BlockPVCs is critical. Support for this capability does NOT exist in Velero or OADP today.
4. Creating a Kasten Policy
In the Kasten Dashboard, select Applications to view all discovered namespaces.
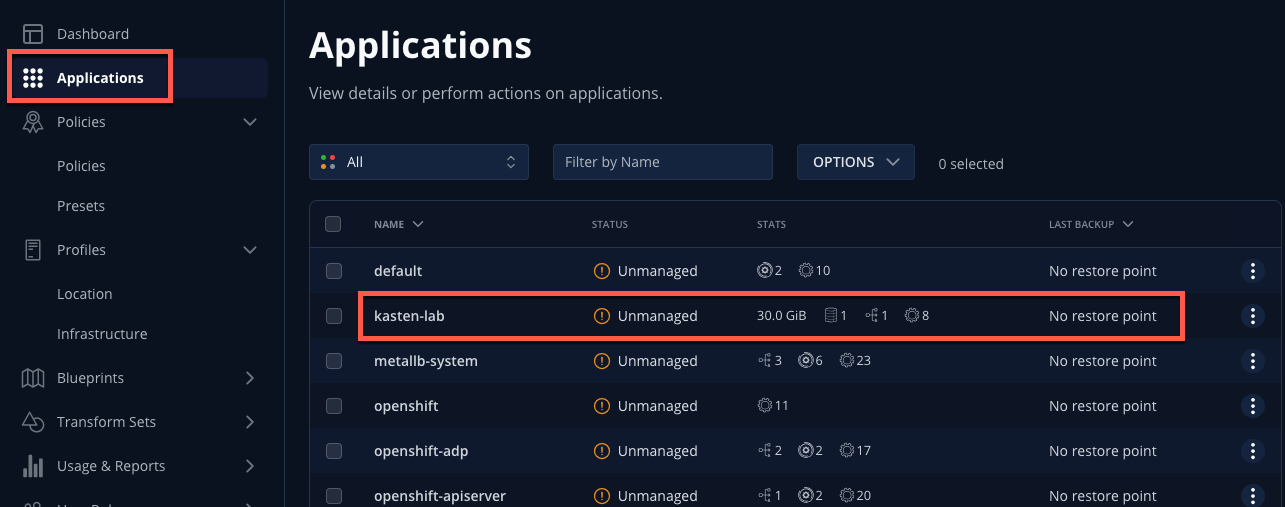
Your
kasten-labapplication should appear as Unmanaged, indicating it is not being protected by any policy.Click
kasten-labin the Applications list to view details about the workloads and additional resources discovered within the namespace.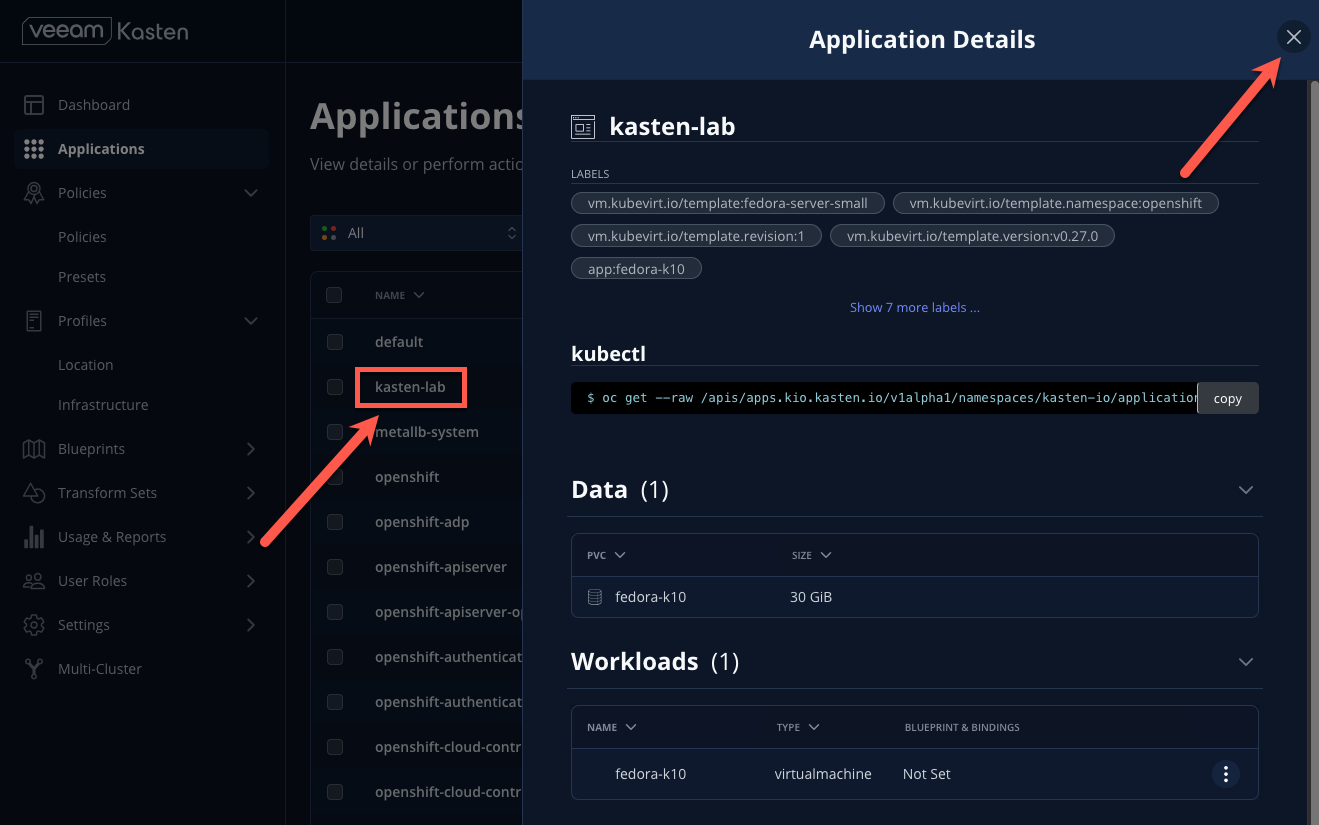
Close the Application Details window.
Under
kasten-lab, select ... → Create a Policy.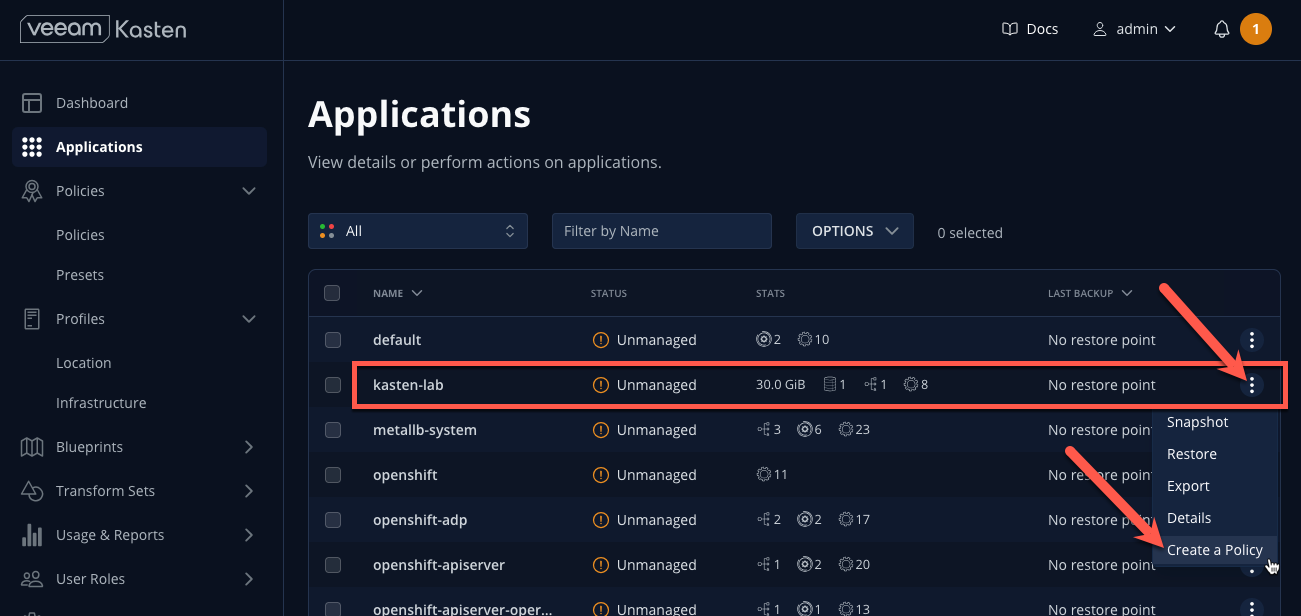
Leave the default Name and Action.
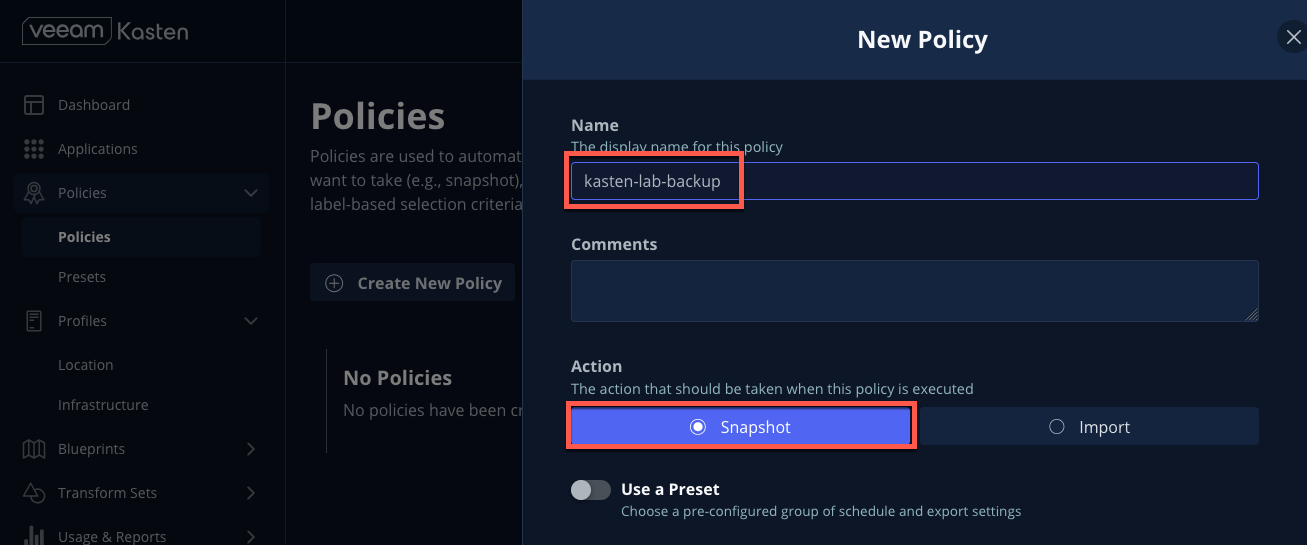
NOTE
Policy Presets provide the option of allowing administrators to define SLA-focused configurations to simplify self-service data protection for other users.
Leave the default Hourly Backup Frequency and Snapshot Retention values.
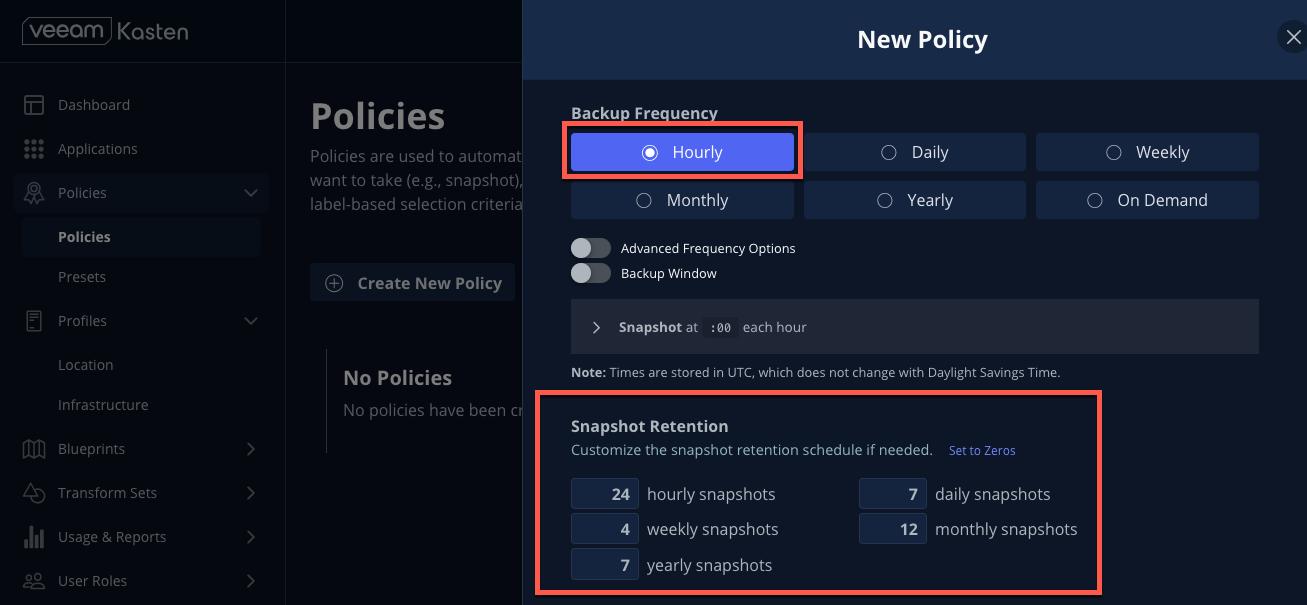
NOTE
Toggling Advanced Frequency Options allows users to specify what time hourly snapshots occur, how many snapshots to take per hour, and which snapshots should be used for daily, weekly, monthly, and yearly promotion.
Toggling Backup Window allows users to specify during what times is Kasten allowed to run the policy. Enabling Use Staggering can intelligently distribute when to start policies during the specified window such that the desired frequency is maintained, but with the least amount of policies running simultaneously, allowing Kasten to reduce the peak load on the cluster.
These settings should be left unselected for this lab.
Toggle Enable Backups via Snapshot Exports and select
ceph-rgw-immutableas the Export Location Profile.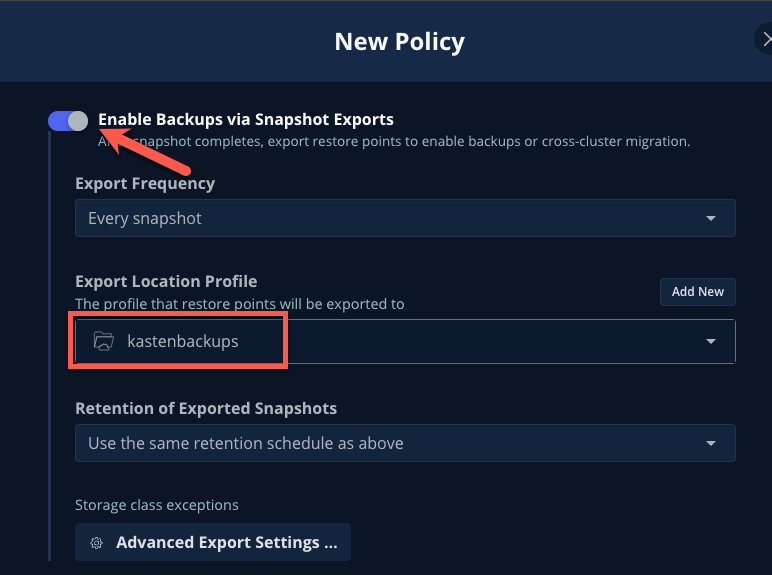
NOTE
By default, Kasten will export all data associated with the snapshot to ensure you have a durable, off-cluster copy. However, there are circumstances where you may only want to export references to the snapshot, such as migrating a workload in AWS from one availability zone to another. This ability to only export snapshot metadata can dramatically improve performance in these specific instances. This can be configured under Advanced Export Settings.
Under Select Applications, verify the
kasten-labnamespace has been selected.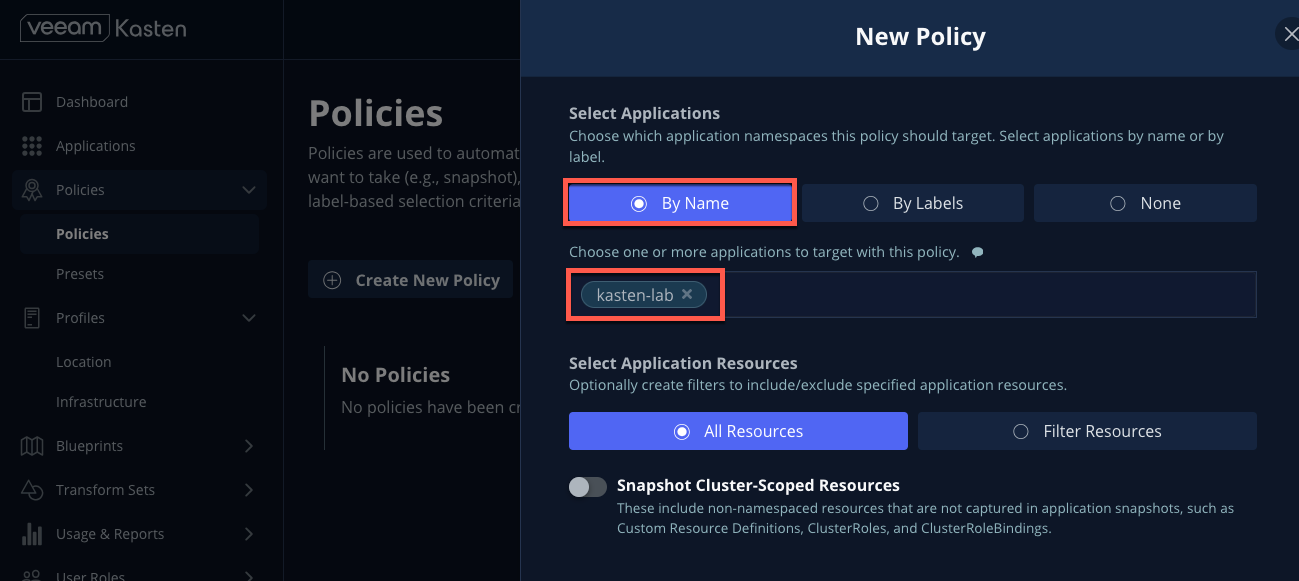
NOTE
Targeting application(s) based on namespace is generally the most straightforward method of defining a backup policy. However, Kasten also allows you to identify applications based on native Kubernetes labels. This is especially helpful if you have many VMs in a single namespace and only want to protect current and future VMs with a specific label on the
VirtualMachineresource, such asbackup: goldorvm: prod.Kasten also provides rich filtering capabilities to include or exclude resources based on Kubernetes API Group, API Version, Resource Type, Resource Name, and Labels. For example, you could exclude backup for Secrets resources where a label includes an indication that the secret is externally managed.
Leave the remaining settings as default.
TIP
When performing many tasks within the Kasten UI, you can press the </> YAML button to expose the native Kubernetes YAML that defines the resource created through the UI. This can be useful for familiarizing yourself with the Kubernetes-native APIs defined by Kasten and for extracting snippets for use in GitOps or Infrastructure-as-Code tools.
Click Create Policy.
5. Freezing the Guest Filesystem
Kasten can freeze the guest filesystem before the snapshot and unfreeze after the snapshot completes by annotating the VirtualMachine resource with k10.kasten.io/freezeVM=true.
In the Web Terminal, enable filesystem freezing for
fedora-k10:bashoc annotate virtualmachine fedora-k10 \ -n kasten-lab \ k10.kasten.io/freezeVM=trueNOTE
The freeze and unfreeze operations will only be attempted if the VirtualMachine is in Running state.
WARNING
Kasten defines a 5 minute default timeout for the snapshot operation to complete before aborting the snapshot operation and unfreezing the VM. This can be overridden using the
kubeVirtVMs.snapshot.unfreezeTimeoutHelm/Operand parameter.
6. Running the Policy
Rather than wait until the top of the hour for the policy to run, you can manually initiate a policy run programmatically or via the UI.
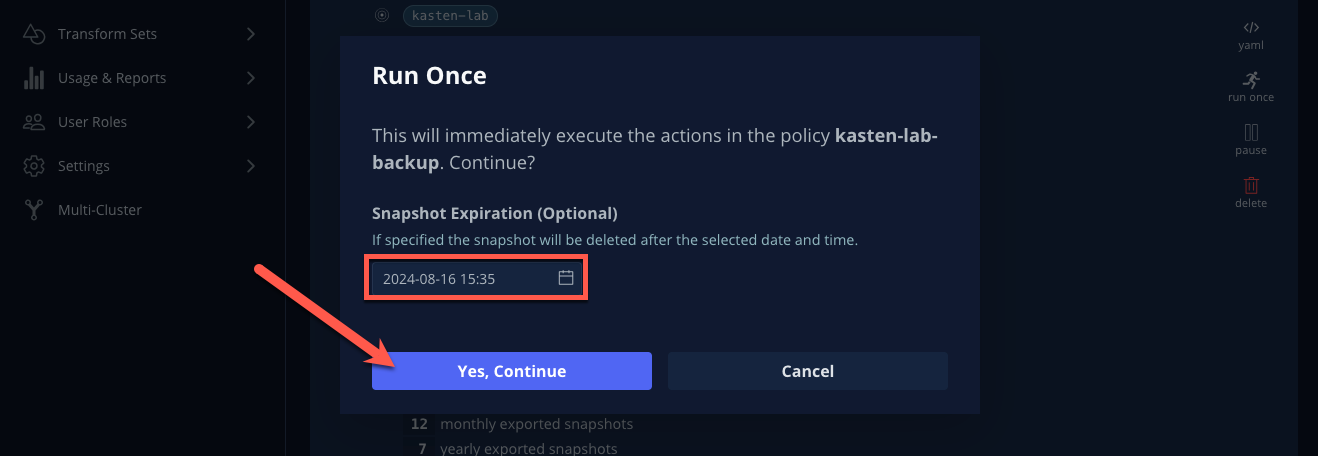
In Kasten Dashboard → Policies → Policies, click Run Once for the
kasten-lab-backupPolicy.
Optionally, specify an expiration date for the manual backup and then click Yes, Continue to start the backup.
Select Dashboard from the sidebar.
Under Actions, select the
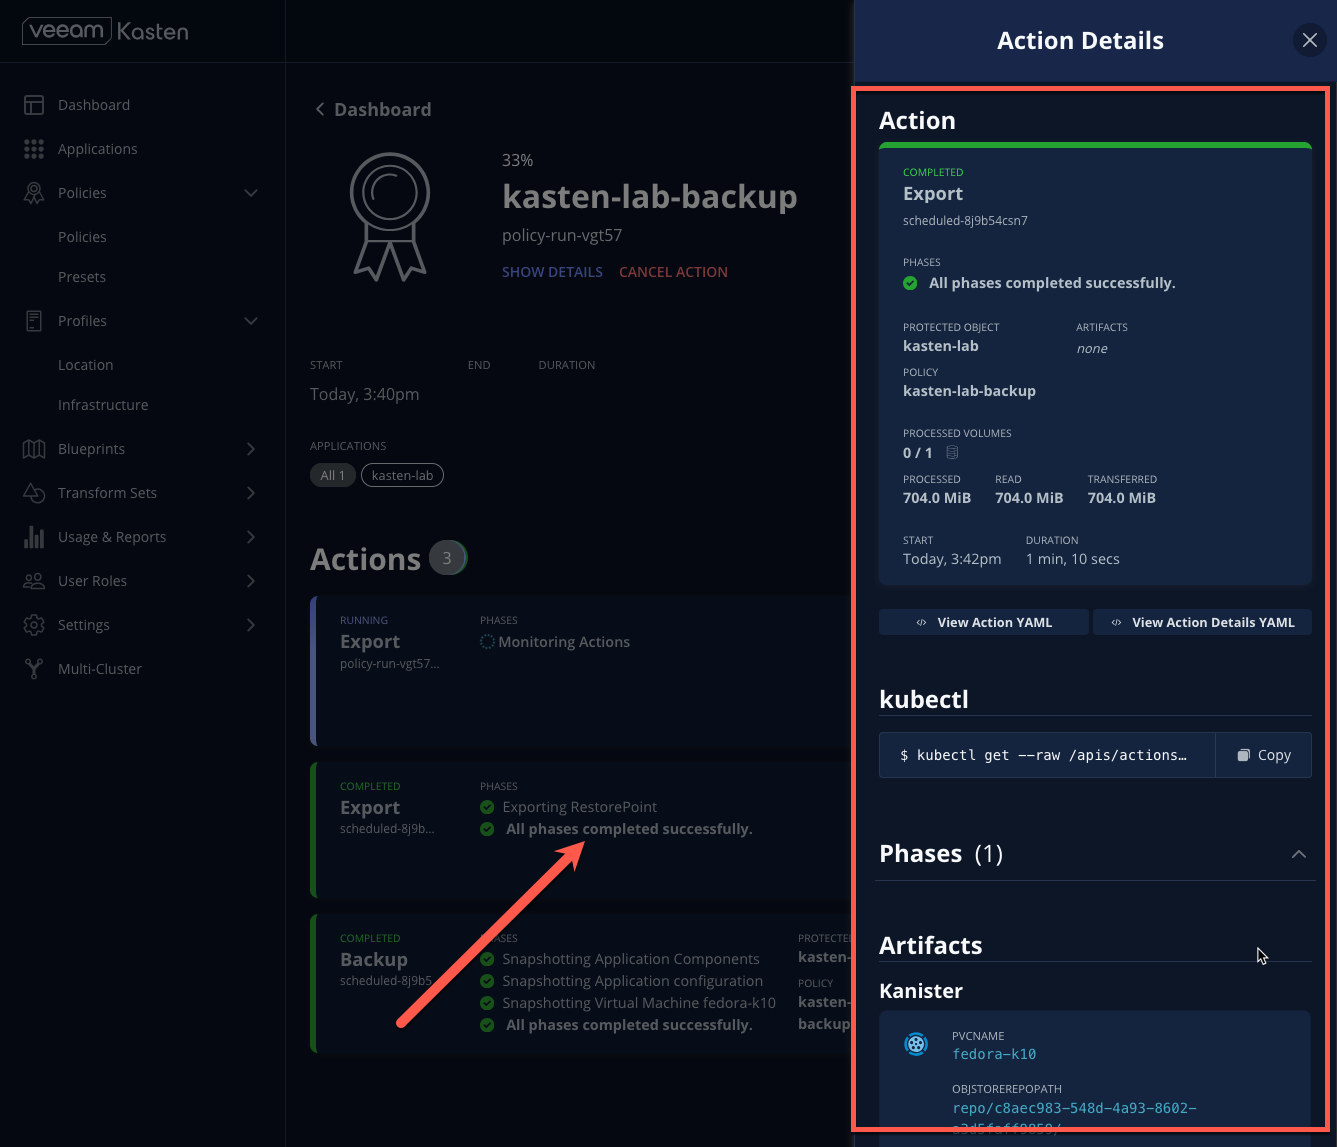
kasten-lab-backupPolicy Run to monitor status.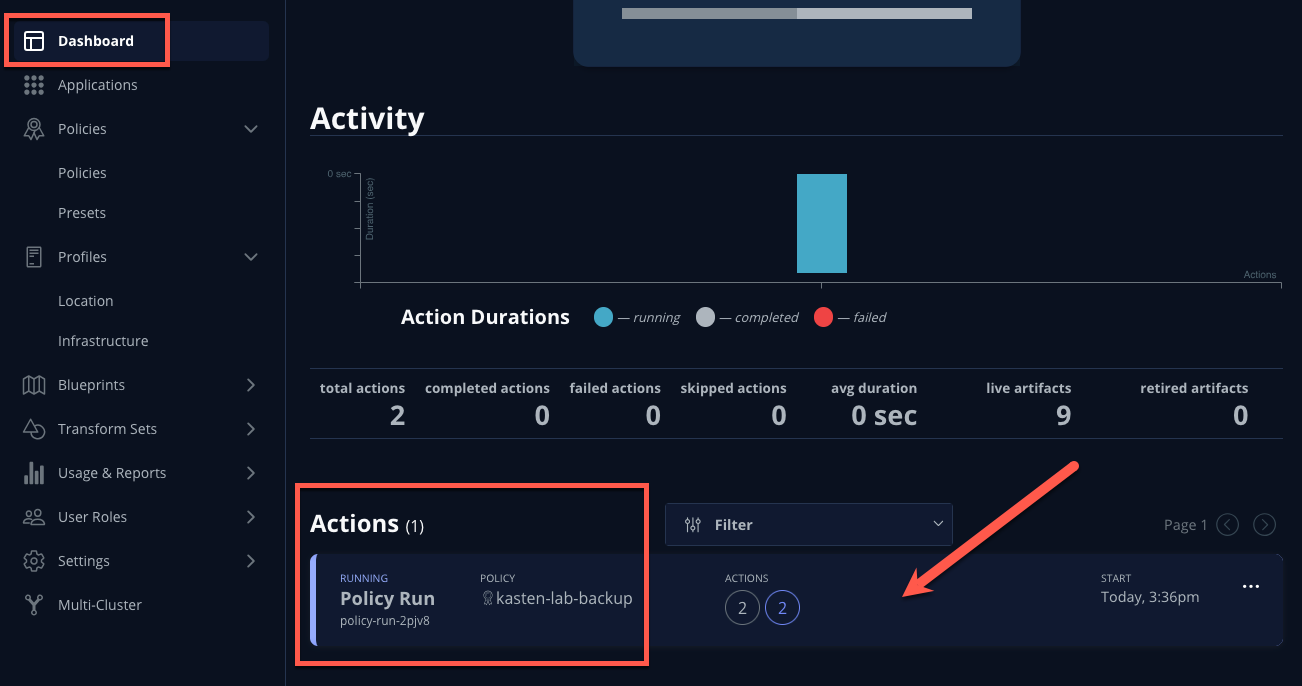
Click into each individual Action to view to associated details, including YAML, a complete list of the application metadata and volume snapshots protected, and how much volume data was transferred by the Kasten datamover to the Location Profile.
Wait for the Policy Run to complete before proceeding.
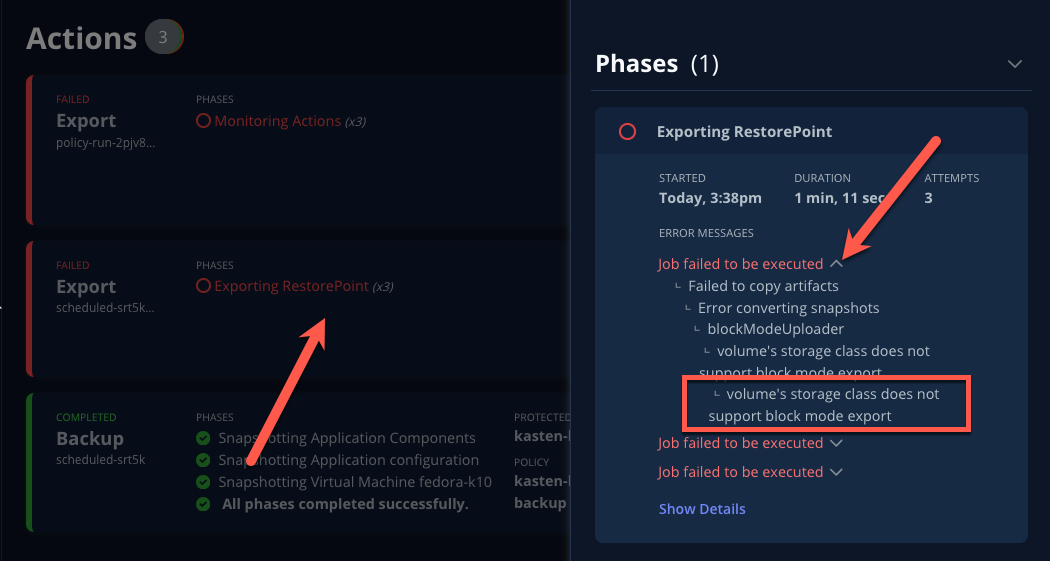
WARNING
If your policy fails, review the provided error message for further details. Did you skip annotating the storage class to allow block mode exports earlier in the lab?
7. Performing a Local Restore
When performing an in-place restore on the application's original cluster, choosing the local RestorePoint provides the most rapid recovery as it uses the snapshot data already present on primary storage, rather than having to depend on data which must be transferred from the remote repository.
In the Kasten Dashboard, select Applications from the sidebar.
You should observe that the
kasten-labStatus has changed to Compliant, indicating that the application is compliant with the backup SLA defined in the policy (i.e. There is a backup for the application created within the last hour to satisfy the hourly policy frequency).Under
kasten-lab, select ... → Restore.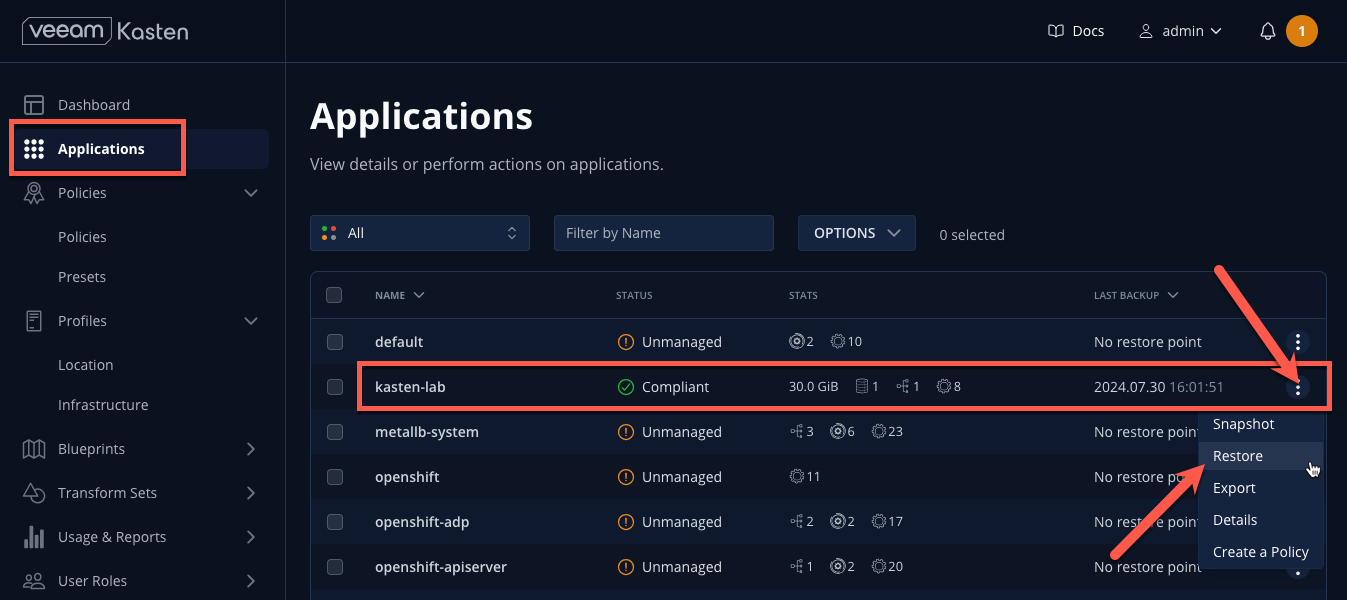
Select the most recent RestorePoint, and click the local version as shown below.
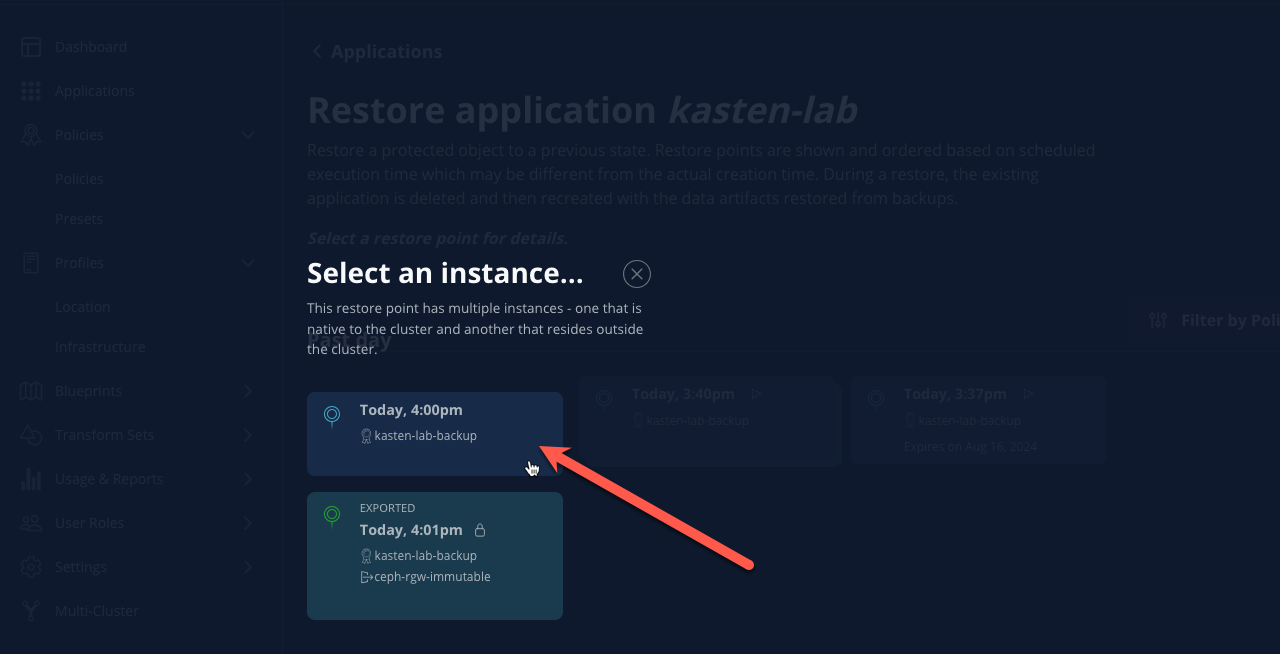
You should observe by default the selected RestorePoint includes all resources captured as part of the backup will be restored to its original namespace - with options to perform a more granular restore and/or modify the target namespace.
Keep the default settings and click Restore to begin a full, in-place restore.
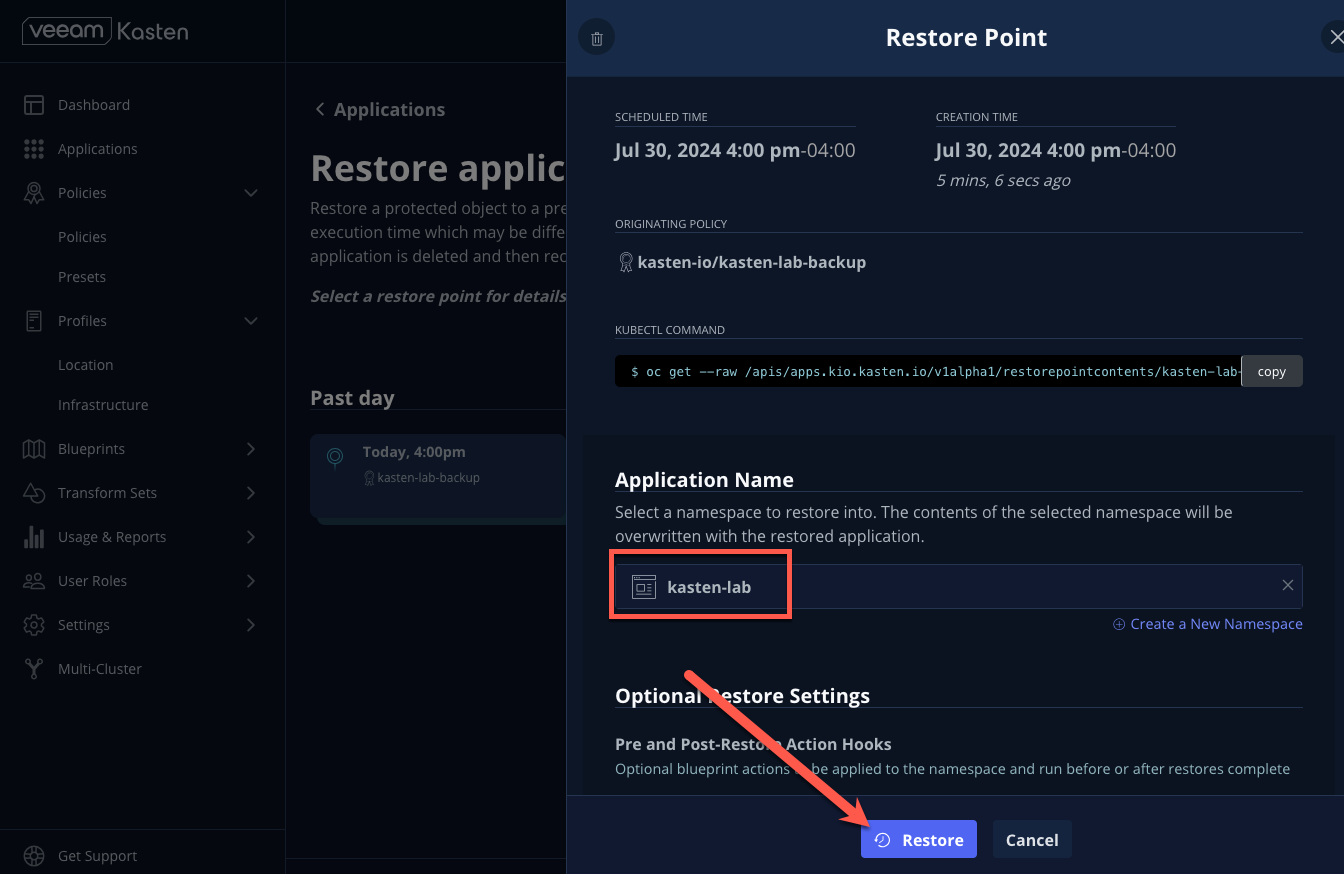
WARNING
Kasten will terminate the running VM and overwrite the existing resources. However, any resources in the namespace that do not exist in the RestorePoint will not be altered (protecting against unintentional data loss).
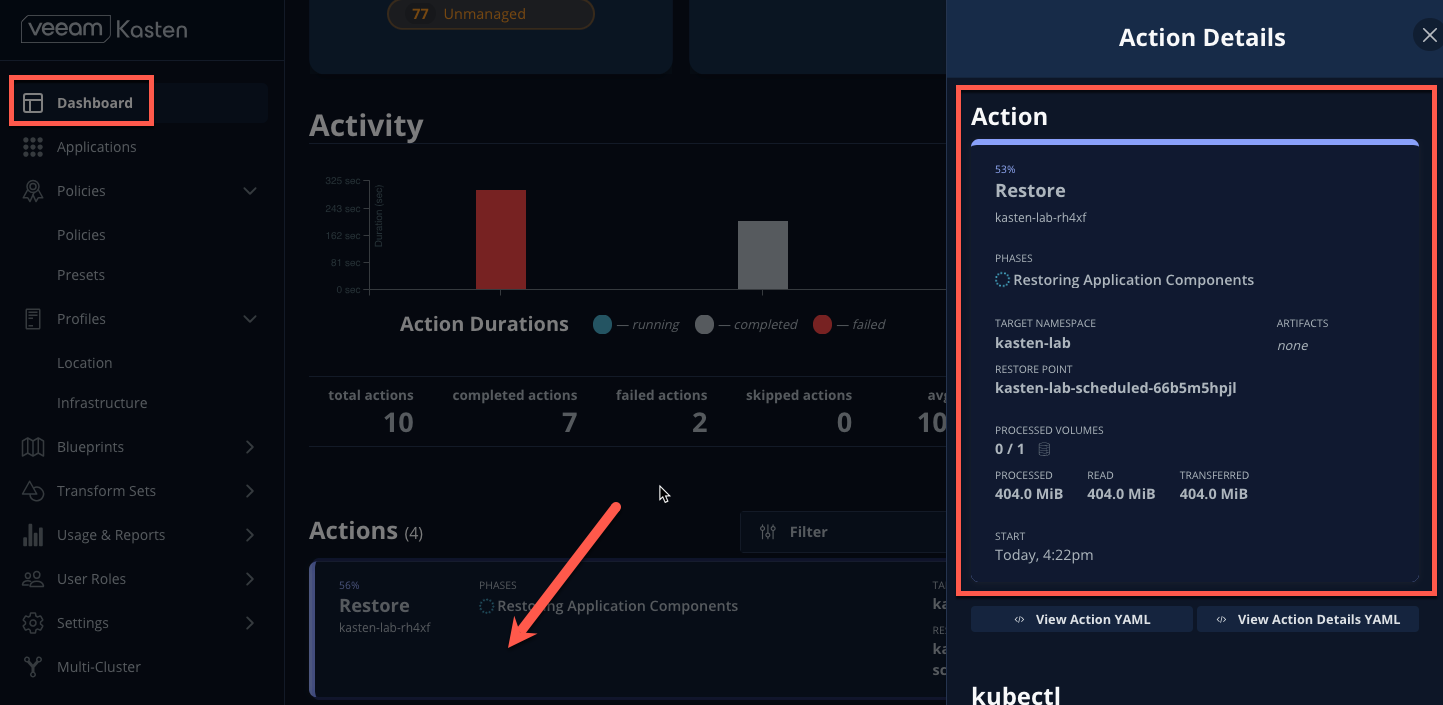
Return to the Dashboard to monitor the status of the Restore under Actions.
You should expect this operation to complete rapidly, as the VM volume is being restored from a local CSI VolumeSnapshot.
Once the Restore has completed, return to OpenShift Console → Virtualization → Virtual Machines and validate the
fedora-k10VM is Running.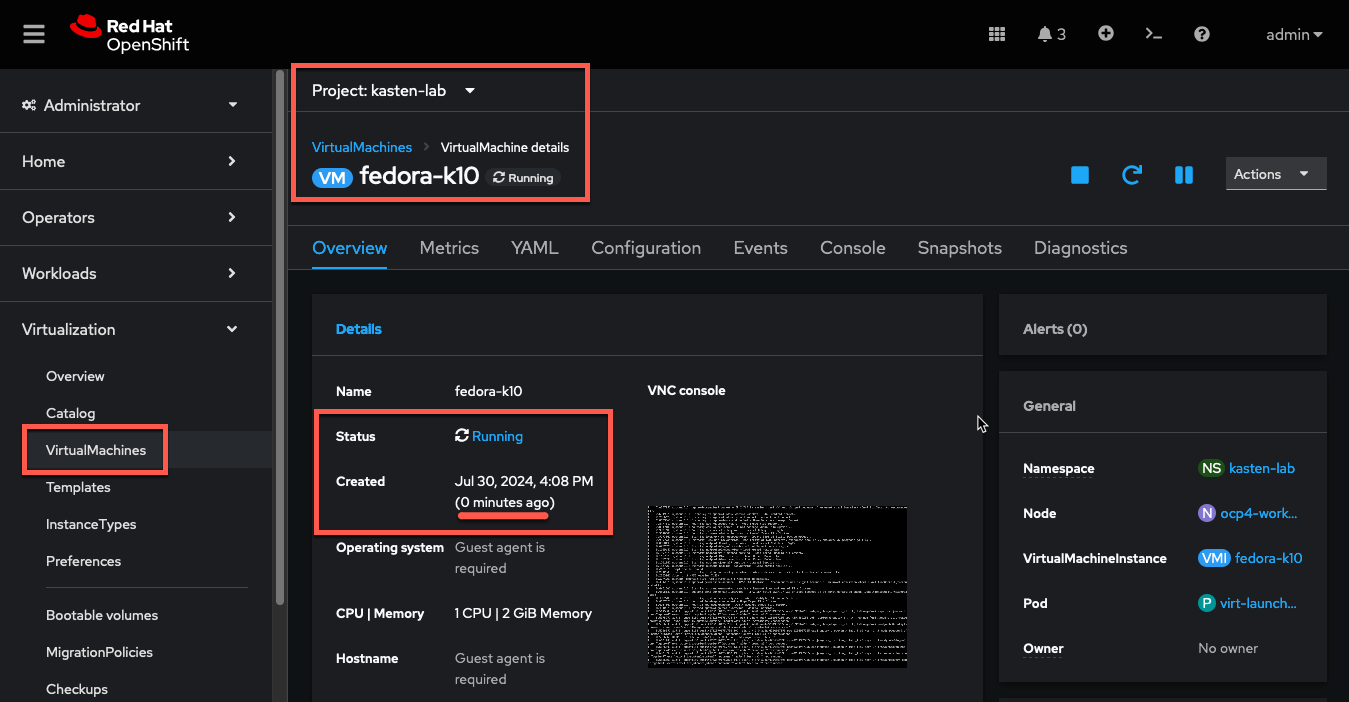
NOTE
You can also validate the source of the restored volume by running:
bashoc describe pvc fedora-k10 -n kasten-labYou should observe the volume's DataSource is a
k10-csi-snap-...VolumeSnapshot, confirming the volume was restored from a local snapshot.
8. Performing a Remote Restore
Often, local snapshot data may not be available, requiring that data be restored from the remote Kasten repository.
In the Web Terminal, run the following to delete the
kasten-labnamespace:bashoc delete virtualmachine fedora-k10 -n kasten-lab oc delete namespace kasten-labIMPORTANT
"Snapshots are not backup." ~ Mark Twain
VolumeSnapshots are namespaced resources. Removing the
kasten-labnamespace will delete the VolumeSnapshots associated with your local RestorePoints. Additionally, theocs-storagecluster-rbdplugin-snapclassVolumeSnapshotClass setsdeletionPolicy: Deleteby default, meaning that deletion of the VolumeSnapshot resource results in the removal of the snapshot within Ceph.In the Kasten Dashboard, select Applications from the sidebar.
You should observe that
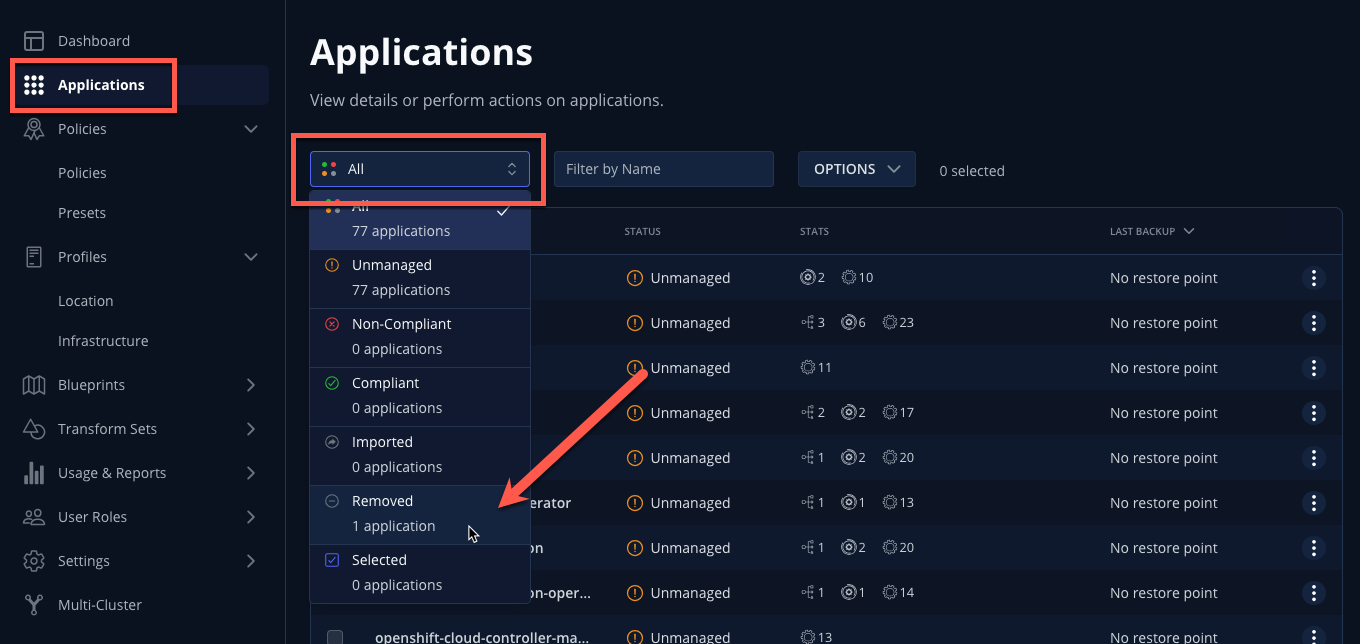
kasten-labno longer appears in the list of applications as the namespace no longer exists on the cluster.Click the All dropdown menu and select Removed to view the list of non-existent namespaces with available RestorePoints.
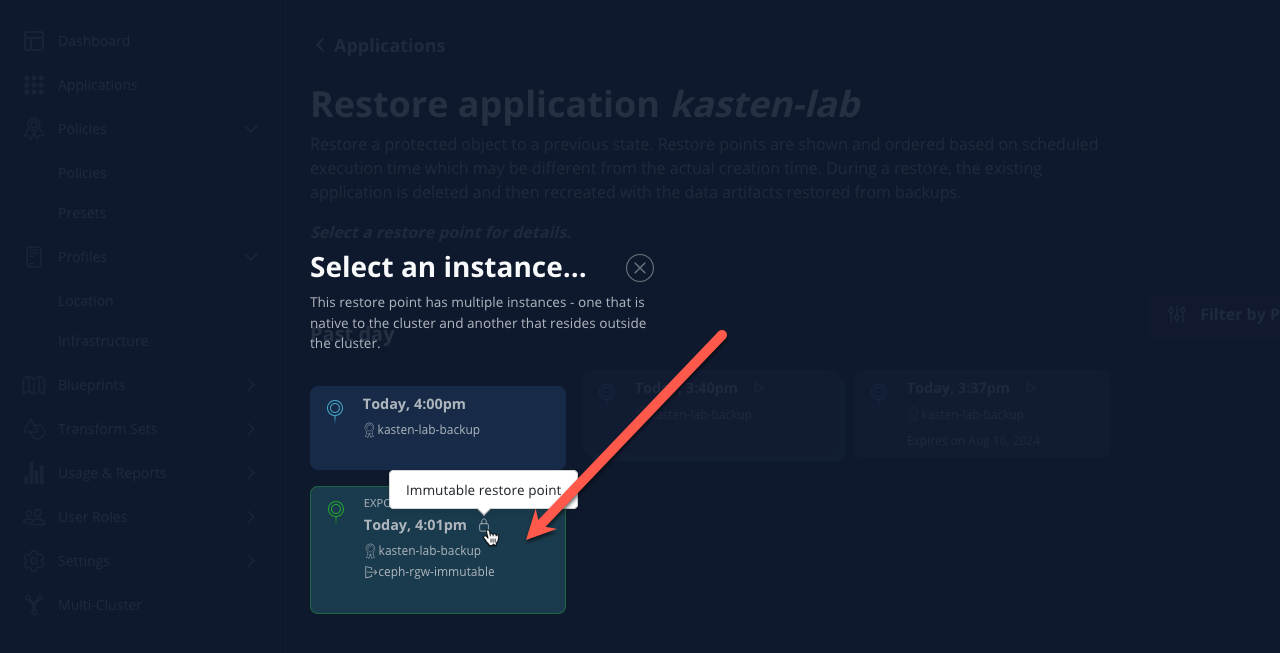
Under
kasten-lab, select ... → Restore.Select the most recent RestorePoint, and click the EXPORTED version as shown below.
Under Application Name, click + Create New Namespace.
Specify
kasten-lab-cloneas the New Namespace and click Create.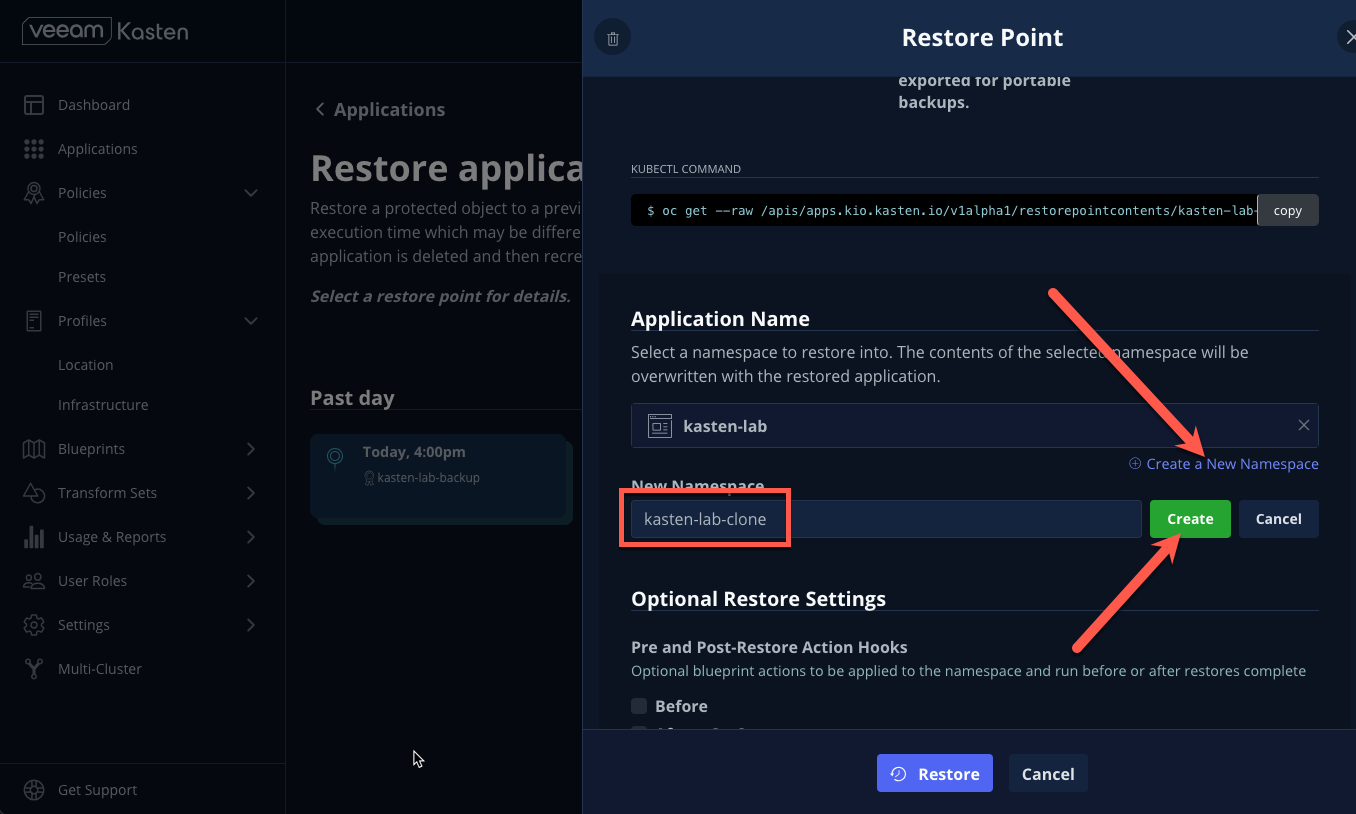
Click Restore and return to the Dashboard to monitor progress under Actions.
Return to OpenShift Console → Virtualization → VirtualMachines and observe the
fedora-k10VirtualMachine now running in thekasten-lab-clonenamespace.
NOTE
Unlike the local restore, the PVC populated by the Kasten datamover will not contain a DataSource snapshot reference:
bashoc describe pvc fedora-k10 -n kasten-lab-clone
9. Takeaways
Congratulations on having protected and restored your first workload using Veeam Kasten! Below are some of the key takeaways of what has been covered in the lab so far:
- Kasten runs on the cluster and can be deployed via OperatorHub or Helm chart
- Kasten supports multiple authentication options (Tokens, OIDC, LDAP, OpenShift OAuth) and Kubernetes-native RBAC for controlling access and providing per-namespace self-service
- Kasten can backup data to S3, Azure Blob, Google Cloud Storage, NFS, and Veeam Backup & Replication
- Immutable backup support prevents unintended or malicious attempts to delete backup data, providing critical protection against ransomware
Blockmode volumes can provideReadWriteManyaccess using Ceph RBD, the most performant option for enabling Live Migration of OpenShift Virtual Machines- Kasten performs always incremental backups with support for both
FilesystemandBlockmode volumes